TiddlyWiki
Learn how to add authentication and authorization to an instance of TiddlyWiki on NodeJS with Pomerium.
What is TiddlyWiki on Node.js
TiddlyWiki is a personal wiki and a non-linear notebook for organizing and sharing complex information. It is available in two forms:
- a single HTML page
- a Node.js application
You will use the Node.js application in this guide.
Authentication with Pomerium
TiddlyWiki allows you to authenticate users with the authenticated-user-header parameter of listen command. Pomerium provides the ability to login with well-known identity providers (IdP).
Pomerium can forward specific user session data to upstream applications. In the case of this guide, Pomerium will forward the email associated with your IdP to TiddlyWiki.
Set up your environment
- Core
- Enterprise
To complete this guide, you need:
Refer to the quick-start guide for more information on how to run Pomerium Core with Docker and Docker Compose.
Configure Pomerium
Add the following code in your config.yaml file:
jwt_claims_headers: email
routes:
  - from: https://wiki.example.local
    to: http://tiddlywiki:8080
    policy:
      - allow:
          or:
            - email:
                is: reader@example.com
            - email:
                is: writer@example.com
The jwt_claims_header forwards the email associated with your IdP in the HTTP request header to TiddlyWiki.
In the policy above, the emails specified (reader@example.com and writer@example.com) will be forwarded to TiddlyWiki.
Configure Docker-Compose
Add the following code in your docker-compose.yaml file:
version: "3"

services:
  pomerium:
    image: pomerium/pomerium:latest
    volumes:
      # Use a volume to store ACME certificates
      - ./config.yaml:/pomerium/config.yaml:ro
    ports:
      - 443:443

  tiddlywiki_init:
    image: elasticdog/tiddlywiki:latest
    volumes:
      - ./wiki:/tiddlywiki
    command: ['mywiki', '--init', 'server']

  tiddlywiki:
    image: elasticdog/tiddlywiki:latest
    ports:
      - 8080:8080
    volumes:
      - ./wiki:/tiddlywiki
    command:
      - mywiki
      - --listen
      - host=0.0.0.0
      - authenticated-user-header=x-pomerium-claim-email
      - readers=reader@example.com
      - writers=writer@example.com
      - username=<reader/writer@example.com>
      - password=password
    depends_on:
      - tiddlywiki_init
Here is what the code is doing:
mywiki --listen host=0.0.0.0starts the TiddlyWiki server, and maps ports0.0.0.0and8080authenticated-user-header=x-pomerium-claim-emailenables Tiddlywiki to receive the user's email address from Pomeriumreadersandwritersauthorizes users to read and/or write to the TiddlyWiki serverusernameandpasswordspecify which user can access TiddlyWiki in a session; excluding these variables will result in a401error
Run docker-compose up.
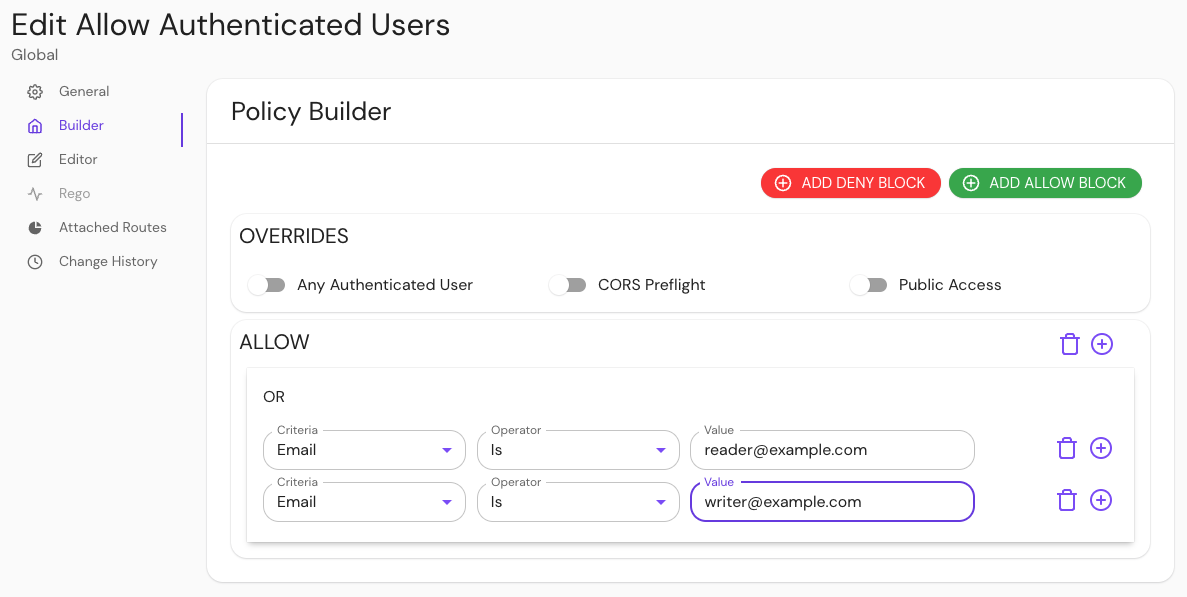
In your Console, create a policy:
- Enter a Name (e.g. 'Allow Authenticated Users')
- Select Builder, ADD ALLOW BLOCK
- Select + and add an OR operator
- Under the Criteria dropdown, select Email
- In the Value field, enter reader@example.com
- Select + and repeat step 5, but enter writer@example.com instead.
Save your policy.

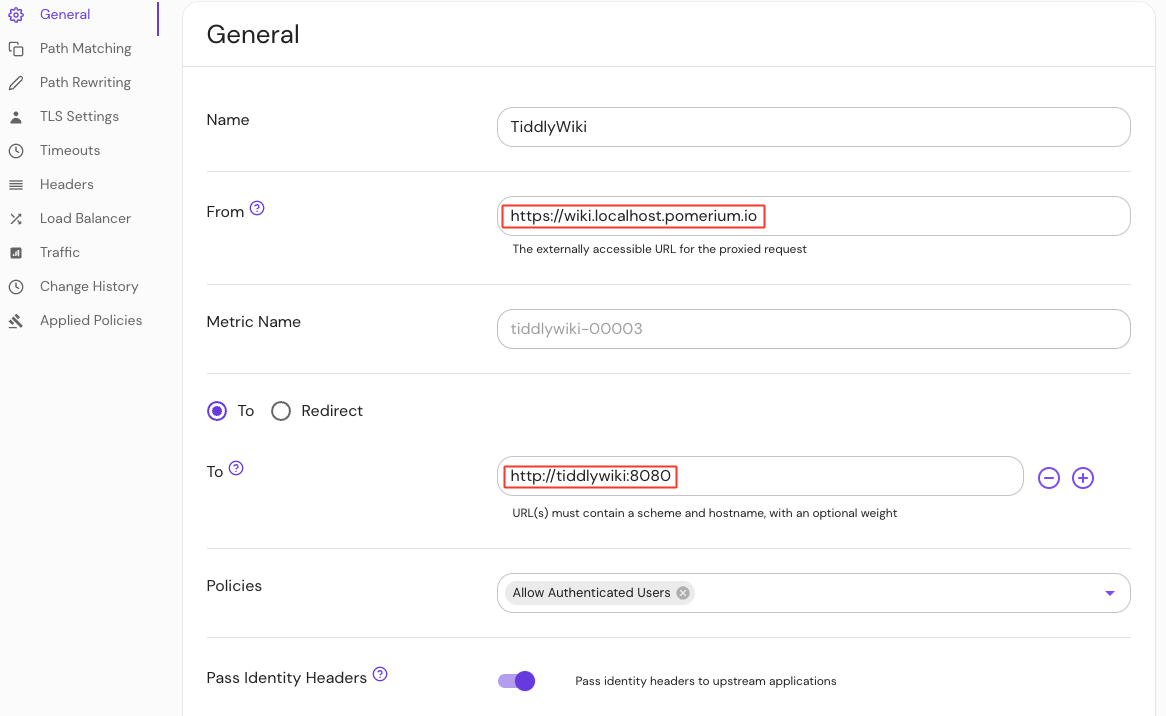
Create a route:
- Enter a Name (e.g. 'TiddlyWiki')
- In the From field, enter the externally accessible URL (e.g.
https://wiki.localhost.pomerium.io) - In the To field, enter the host name (e.g.
http://tiddlywiki:8080) - Under Policies, select Add Authenticated Users
- Select Pass Identity Headers
Save your route.

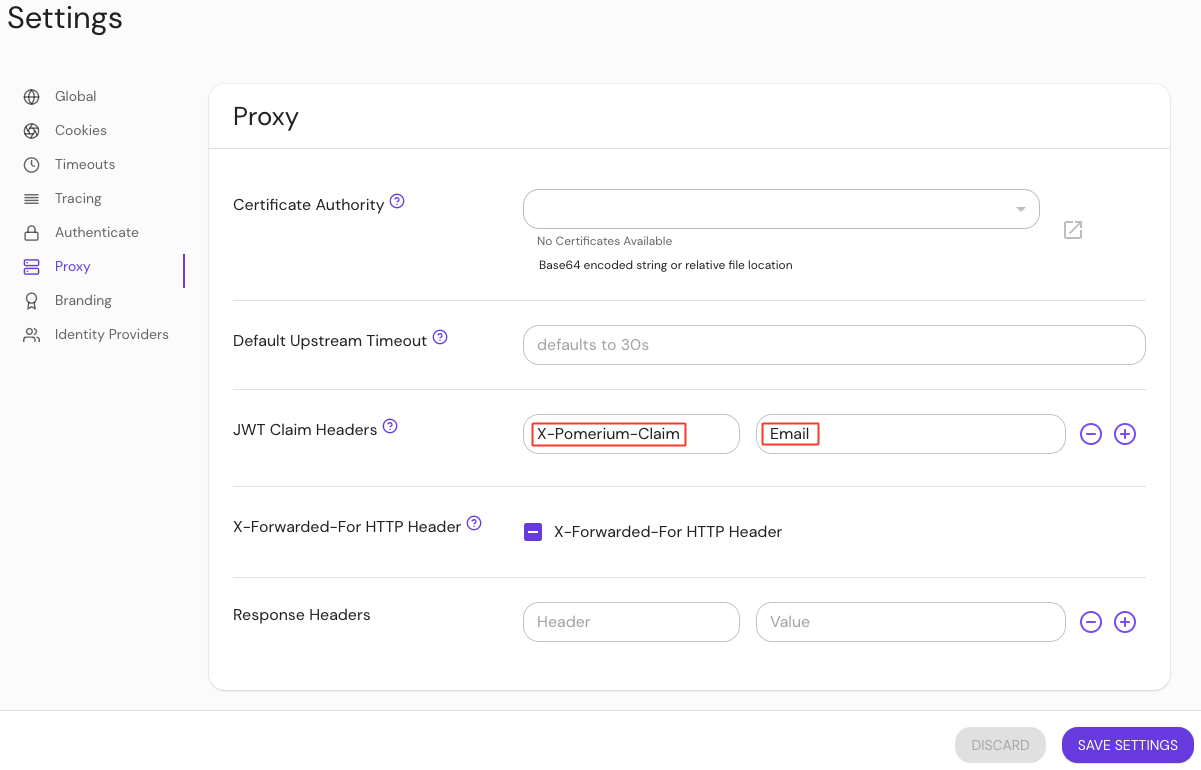
Configure your settings to send JWT claims headers to the upstream application:
- Under Settings, select Proxy
- In the Header Key field, enter X-Pomerium-Claim
- In the JWT Claim field, enter Email
Save your settings.

Test your routes
Navigate to your TiddlyWiki instance (e.g. https://wiki.example.local) and log in using the following usernames:
- If you log in as
reader@example.com, you can only read tiddlers - If you log in as
writer@example.com, you can read and write tiddlers - If you log in as
user@example.com, you will receive a 401 error