Grafana
Learn how to use Pomerium to authenticate and authorize users of Grafana.
What is Grafana?
Grafana is an open-source analytics visualization and monitoring tool. It provides many user-contributed Dashboards that make it popular for enthusiasts as well as professionals.
This guide will demonstrate how to secure an instance of Grafana behind Pomerium, and provide users with a seamless login to Grafana using your identity provider.
Configure Pomerium
- Core
- Enterprise
To complete this guide, you need:
- Docker and Docker Compose
- A pre-configured identity provider (IdP)
See the Pomerium quick-start guide to run Pomerium in a containerized Docker environment.
This guide uses GitHub as the pre-configured IdP, but you can use any supported IdP.
Build a Grafana route
In your config.yaml file, add the following Grafana route:
- from: https://grafana.localhost.pomerium.io
  to: http://grafana:3000
  host_rewrite_header: true
  pass_identity_headers: true
  policy:
    - allow:
        or:
          - email:
              is: user@example.com
In the code above:
host_rewrite_headerrewrites theHost:header to match an incoming header value. Without this option enabled, Grafana will throw a403: Origin not allowederror after login when you attempt to add users.
This behavior is due to a CSRF check added in Grafana v8.3.5 (this guide uses v9.2.4) that requires the Origin request header to match the server origin.
See this GitHub issue for more information.
Configure Grafana to use JWT authentication
Configuring Grafana to use JWT authentication makes it possible for Grafana to accept identity claims sent upstream by Pomerium.
Since you're not using a grafana.ini file to configure your Grafana instance, you can override Grafana's configuration using environment variables. See the Grafana docs for more information.
In your docker-compose.yaml file, add the Grafana Docker image as a service:
grafana:
  image: grafana/grafana:latest
  ports:
    - 3000:3000
  environment:
    - GF_AUTH_SIGNOUT_REDIRECT_URL=https://grafana.localhost.pomerium.io/.pomerium/sign_out
    - GF_AUTH_JWT_ENABLED=true
    - GF_AUTH_JWT_HEADER_NAME=X-Pomerium-Jwt-Assertion
    - GF_AUTH_JWT_EMAIL_CLAIM=email
    - GF_AUTH_JWT_JWK_SET_URL=https://grafana.localhost.pomerium.io/.well-known/pomerium/jwks.json
    - GF_AUTH_JWT_CACHE_TTL=60m
  volumes:
    - ./grafana-storage:/var/lib/grafana
Here's what the environment variables do:
GF_AUTH_SIGNOUT_REDIRECT_URL: signs users out of Pomerium when they sign out of GrafanaGF_AUTH_JWT_ENABLED: enables JWT authentication (Grafana disables it by default)GF_AUTH_JWT_HEADER_NAME: tells Grafana which HTTP header to look at for the JWT (see Identity Verification for more information)GF_AUTH_JWT_EMAIL_CLAIM: associates theemail_claimin the JWT with the email of the Grafana userGF_AUTH_JWT_JWK_SET_URL: defines the URL with the signing key to validate the JWTGF_AUTH_JWT_CACHE_TTL: sets a 60-minute cache time for the token
Run docker-compose up and navigate to https://grafana.localhost.pomerium.io.
To complete this guide, you need:
Configure Pomerium Enterprise
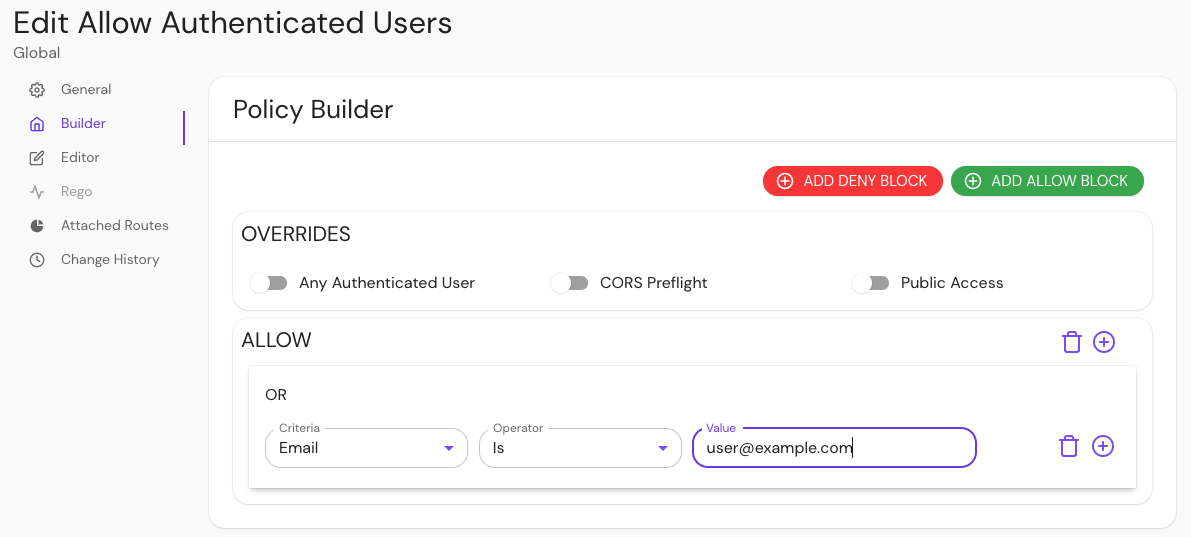
In your Console, create a policy:
- Enter a Name (e.g. 'Allow Authenticated Users')
- Select Builder, ADD ALLOW BLOCK
- Select + and add an OR operator
- Under the Criteria dropdown, select Email
- In the Value field, enter user@example.com
Save your policy.

Build a route:
- Enter a Name (e.g. 'Grafana')
- In the From field, enter the externally accessible URL (e.g.
https://grafana.localhost.pomerium.io) - In the To field, enter the host name (e.g.
http://grafana:3000) - Under Policies, select Allow Authenticated Users
- Select Pass Identity Headers
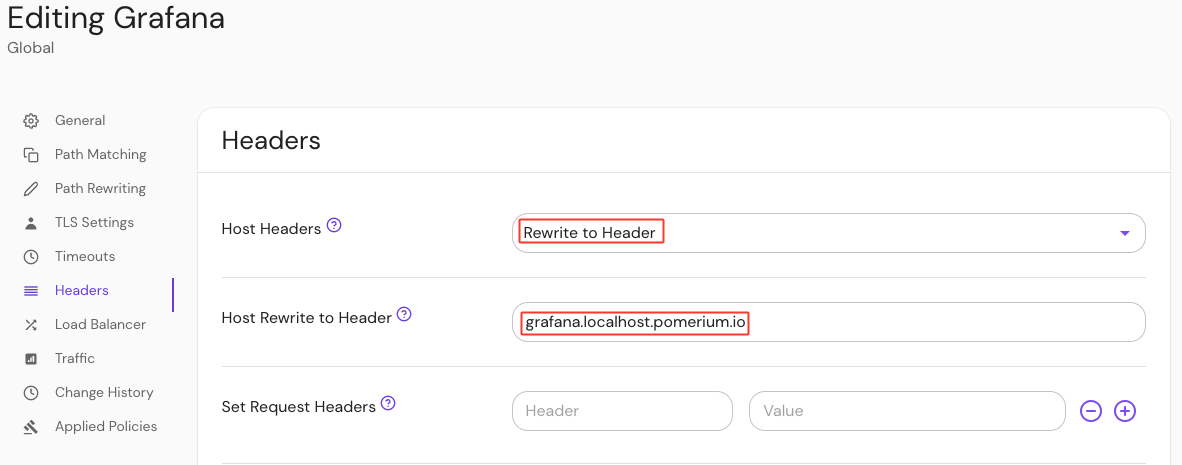
Configure your route to rewrite the Host: header:
- Under the Create route sidebar, select Headers
- In the Host Header field, select Rewrite to Header from the dropdown menu
- In the Host Rewrite to Header field, enter
grafana.localhost.pomerium.io

This Host Rewrite option rewrites the Host: header to match an incoming header value. Without this option enabled, Grafana will throw a 403: Origin not allowed error after login when you attempt to add users.
This behavior is due to a CSRF check added in Grafana v8.3.5 (this guide uses v9.2.4) that requires the Origin request header to match the server origin.
See this GitHub issue for more information.
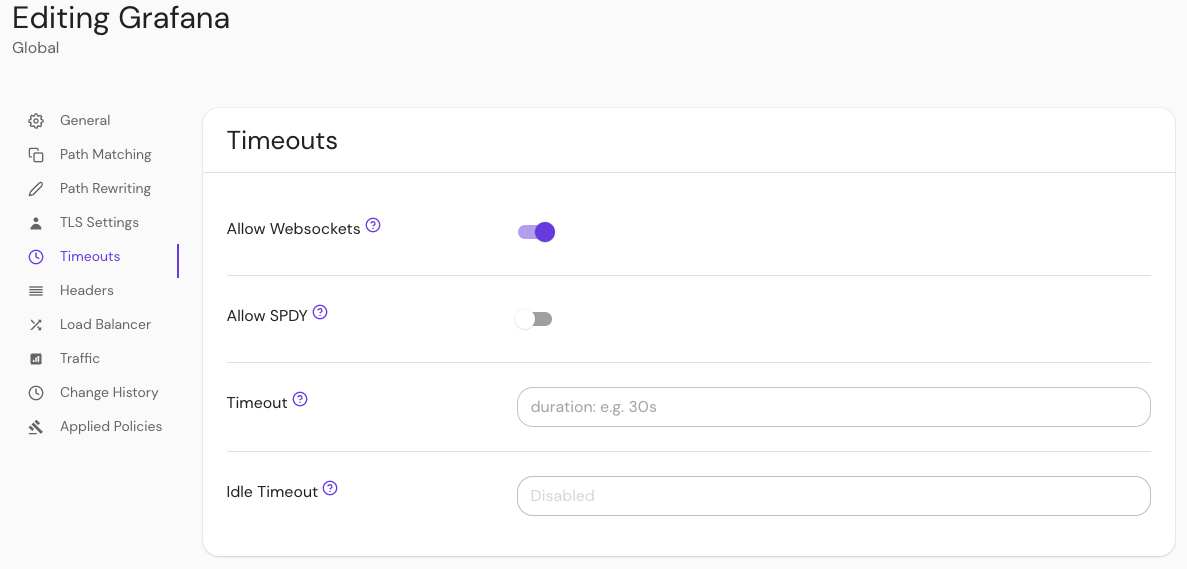
Configure your route to allow websockets:
- Under the route sidebar, select Timeouts
- Select Allow Websockets

Save your route.
Configure Grafana to use JWT authentication
You need to configure Grafana to enable JWT authentication. This makes it possible for Grafana to accept identity claims sent upstream by Pomerium.
In your grafana.ini file, make the following changes:
[auth]
signout_redirect_url = https://grafana.localhost.pomerium.io/.pomerium/sign_out
[auth.jwt]
enabled = true
header_name = X-Pomerium-Jwt-Assertion
email_claim = email
jwk_set_url = https://grafana.localhost.pomerium.io/.well-known/pomerium/jwks.json
cache_ttl = 60m
Under [auth]:
signout_redirect_url: signs users out of Pomerium when they sign out of grafanasignout_redirect_url: signs users out of Pomerium when they sign out of Grafana
Under [auth.jwt]:
enabled = true: enables JWT authentication (Grafana disables it by default)header_name = X-Pomerium-Jwt-Assertion: tells Grafana which HTTP header to look for the JWT (see Identity Verification for more information)header_name = X-Pomerium-Jwt-Assertion: tells Grafana which HTTP header to look at for the JWT (see Identity Verification for more in formation)email_claim: associates theemail_claimin the JWT with the email of the Grafana userjwk_set_url: defines the URL with the signing key to validate the JWTcache_ttl: sets a 60-minute cache time for the token
See the Grafana docs for more information on custom and default configurations.
Add users to Grafana
At this stage, Grafana is configured to use the email claim in the JWT to associate an incoming connection with a user (you will configure Pomerium to include identity information via the JWT in the next section).
But, the user first must exist in Grafana to be associated. Otherwise, you will see the following error in the browser after authenticating:
{"message": "User not found"}
To avoid this error, create a user with administrator privileges. (If you plan on administering Grafana through a direct connection to the service, skip this section.)
To add users without requiring them to accept an invitation:
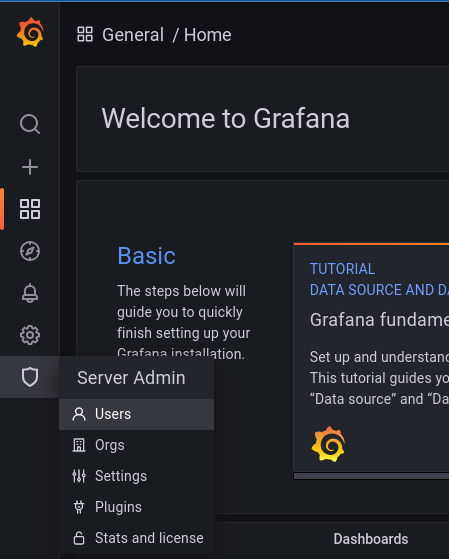
Log in to Grafana directly as an admin user at
https://grafana.localhost.pomerium.io(if this is your first time signing up for Grafana,adminis the default username and password)Select Server Admin, Users
 caution
This is distinct from the Users option under the Configuration cog wheel, which will only finalize a new user when they accept an invite via email or link.
Select New user to create a new user. Make sure that the email address matches the one provided by Pomerium via your IdP.
tipYou can access the special endpoint
/.pomeriumfrom any Pomerium route to view the data provided by Pomerium in the JWT.
After creating a new user in Grafana, that user should be logged in automatically when they access Grafana from the Pomerium route (after first authenticating with your IdP, of course).
Manage access at scale
Ensure that Grafana is up to date to take advantage of auto_sign_up, as it is only available for JWT as of version 8.4.0.
The steps outlined above work to confirm the configuration for small teams, but adding users individually and manually does not scale for larger organizations. To add users to Grafana at scale, you can use the Grafana's auto_sign_up configuration to auto sign up users as they log in:
[auth]
signout_redirect_url = https://grafana.localhost.pomerium.io/.pomerium/sign_out
[auth.jwt]
enabled = true
header_name = X-Pomerium-Jwt-Assertion
email_claim = email
jwk_set_url = https://grafana.localhost.pomerium.io/.well-known/pomerium/jwks.json
cache_ttl = 60m
username_claim = sub ;sets the username to the value of the "sub" claim
auto_sign_up = true ;sets the login to automatically create a new user if one doesn't exist
[users]
auto_assign_org = true ;auto assigns the user to the existing default organization
auto_assign_org_role = Editor ;auto assigns the user the "Editor" role
Note that the value of auto_assign_org_role could also be "Admin" or "Viewer".
This will automatically create a user with their email and username populated.
Pomerium now autopopulates the JWT name claim by default with the value provided by the identity provider.
You don't need to pass the name claim as a custom header with the jwt_claims_headers setting as was previously instructed in this guide.
This configuration will allow seamless authentication and authorization without any additional toil for your team.
For Google users: When using Google as an IdP, the user field is populated by a numeric value that you cannot configure. Note that Grafana can accept the name field as a username, including spaces:
username_claim = name
Troubleshooting
Local Signing Key
In instances where Grafana cannot get the signing key for the JWTs from the Pomerium authenticate service, you can place a copy of the key locally.
For example, wildcard certificates signed by LetsEncrypt may still be cross-signed by the expired DST R3 root. While many browsers still trust these certificates (as long as they are also signed by a valid root), some applications reject them, including Grafana:
logger=context error=Get "https://grafana.localhost.pomerium.io/.well-known/pomerium/jwks.json": x509: certificate signed by unknown authority
To circumvent this issue, you can use curl or wget to download the signing key locally:
- curl
- wget
From the Grafana host:
curl https://grafana.localhost.pomerium.io/.well-known/pomerium/jwks.json > /etc/grafana/jwks.json
From the Grafana host:
wget -O /etc/grafana/jwks.json https://grafana.localhost.pomerium.io/.well-known/pomerium/jwks.json
Edit grafana.ini and add the jwk_set_file key to provide it to Grafana:
[auth.jwt]
enabled = true
header_name = X-Pomerium-Jwt-Assertion
email_claim = email
jwk_set_file = /etc/grafana/jwks.json
cache_ttl = 60m